Valentine’s Day: though one could arguably claim that it’s a fake holiday created by card and candy companies, but we all buy into it one way or another. For those who feel forever alone and/or work during the holiday, we treat ourselves to the day AFTER V-Day when all the candy is half-off. For those who are #blessed to have a significant bae in their lives, the splurging on material relics to prove your love can quickly add up. Either way, an inevitable box of half-eaten bites doesn’t really sit well in anyone’s budget.
Chocolate can get pretty pricey this time of year, and while the sentiment of buying a 210 -Piece Box of Chocolate for $375 in Chelsea might scream “YOU’RE GONNA PUKE WE’RE SO IN LOVE,” I’m here to show you that there’s another way to meet the sweetness quota without shelling out full-price dough: by making treats yourself!
Buckle up and call me Winnie Wonka ya’ll, because I’m about to school all you love bugs out there on how to make quality treats without breaking the bank! Growing up, my crafty romantic of a mother was constantly making goodies for my brother and I to take to school parties and fundraisers, and I’m ready to bestow these beautiful little golden tickets of DIY knowledge into your life, because you’re awesome-sauce. Whether it be for roommates, friends, co-workers, or to leave on your ex’s doorstep, let this be a truly sweet Valentine’s treat…literally.

Step one: Buying supplies
- Wilton Candy Melts – I’ve gotten 12 oz. bags of these candy melts from Michael’s as well as Party City. If you’re looking for a better bargain, Michael’s is known for having excellent coupons daily, with major markdowns on Valentine-themed gear supplies. I was able to score two 12 oz. bags of Dark Cocoa for $2.49 each (usually marked at $2.99).
- If more variety is what you seek when it comes to your candy melts, Party City usually has a larger variety of colors and types, but sadly at a higher price (marked at $3.49 for their 12 oz. bags). Here I scored more festive colors like hot pink and red, as well as white for some accented decorative drizzling.
- Hope-tip: If you or your loved one are living the vegan dream, you can find vegan chocolate for melting at Whole Foods and Trader Joe’s!
- Snacks for dipping – Life is almost a box of chocolates when it comes to dippable snacks for this project, but for this DIY I’ll be using standard Oreos (usually marked between $3.30-$4) and a bag of pretzel rods ($2.99).
- For vegan dippables, fruit like strawberries work great! Dare I suggest even making some fruit kabobs? Other great alternatives include chocolate covered nuts like almonds (great snack to have in general), as well as drizzle chocolate popcorn! And in case you didn’t know, Oreos are vegan too.
- Hope-tip: Check your goods before check-out so you’re not running back to Associated after opening a bag of half-broken pretzel rods.
- Crock-Pot – If you don’t have a crock pot in your life already, I highly suggest investing in one or asking your mom for one for Christmas like I did. You’ll be using this for chocolate melting, amongst other purposes like melting cheese for fondue, making homemade soaps, and also working as an essential oil diffuser! You can also find $20 Crock-Pots at Target.
- Slotted spoon – Perfect for letting excess chocolate drip off your dippables. You can find a slotted spoon at Target while you’re there buying your new Crock-Pot!
- Wax Paper – This is so your treats won’t freeze to the plate while in the fridge. Available at most grocery stores and some bodegas.
- Sprinkles, chocolate chips, shredded coconut, etc. – All optional in case you want to give ’em the ol’ razzle dazzle. Available at varying prices, sprinkles can be found at Michael’s and Party City along with your candy melts, as well as many grocery stores in their baking aisles.
Step two: Prep your work station
- Plug in the Crock-Pot and pour in your bags of candy melts. Start off the Crock-Pot on “high” but lower it to”warmer” after the initial chocolate is melted so the chocolate doesn’t burn.
- While you’re waiting for things to start heating up, now is a great time to make sure you’re working in a clean-counter zone.
- Make room in your freezer. You’re going to need a leveled space to let your chocolate coatings freeze.
- Prep sheets of wax paper to plate. Common sense, but I mention this now because I forgot while making my treats.
- By now, your candy melts should be melting, but it helps to stir frequently before and while they’re melting so it all melts quicker.
Hope-tip: If the melted chocolate feels thick (you’ll know it when you’re stirring), add a small splash of vegetable oil or a dollop of coconut oil to the chocolate and stir. This will help thin it out some which makes for a more even coat for freezing your goodies, but remember to just keep stirring.
________

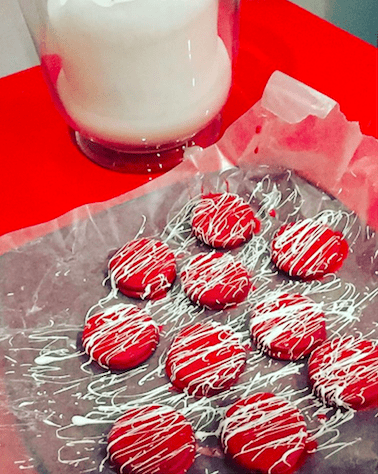
Step Three: Get to dippin’ (For Chocolate Covered Oreos)
- Once your chocolate is melted and your work station is prepped, submerge your first Oreo. It’s best to dip one at a time.
- Flip your Oreo once or twice with your slotted spoon to make sure it’s completely covered in chocolate goodness.
- Satisfied in optimum coverage, let the excess chocolate drip off before placing onto a wax paper-readied plate. You can do this by tapping your slotted spoon on the edge of the Crock-Pot, but don’t do it hard enough that it shakes the cookies back into the chocolate lava.
- Seven or eight Oreos later (or as many as you can space out on the plate), place your cookies in the freezer to harden.
- Freeze for 10 minutes
- Voila! You’ve successfully made your first batch of chocolate covered Oreos. If the batch looks a little messy, don’t fret! You can take a knife and chip off excess chocolate to make your Oreos look cleaner.
Hope-tip: If you’re feeling particularly adventurous and want a little bit more to your treats, all you need to do it take a small dollop of the melted chocolate, spread it on top of you’re already chocolate covered cookies, add your edible decor, and then stick them back in the freezer for an additional 8-10 minutes!
________
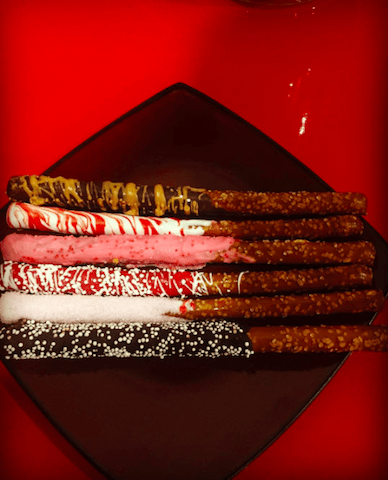
For Chocolate Covered Pretzel Rods:
- When candy melts are melted, hold a pretzel rod over the Crock-Pot while spooning chocolate over half of it. This way you can still hold the rod without making a hot mess.
- Once you have the desired length covered in chocolate, lightly tap the pretzel against the Crock-Pot.
- For pretzels, it’s better to put the sprinkles and other edibles on now so it all hardens at the same time.
- After you have all your desired pretzels fitted on you wax-papered plate, put in the freezer for ten minutes and DONE!
Hope-tip: If you have a candy melt you want to use more for drizzle/decorating purposes, you can save melts by only throwing a small handful into a microwaveable safe bowl and nuking it for two minutes (or until fully melted). I managed a sweet marble effect with my pretzels by drizzling on the second color after my first coat, and then rotating the pretzel while allowing the excess drip away.
________

Step Four: Enjoy!
There you go! That wasn’t too bad, was it? Be sure to keep your delicious treats refrigerated before the big reveal, and don’t forget presentation! I can’t endorse the good people of Michael’s enough when I tell you to take advantage of their coupons and deals to get cute Valentine’s Day decoration! Doesn’t the above picture look nicer than a $375 box of chocolates? Maybe not, but at least it’s more colorful and more thought out than just grabbing something from CVS last minute, all while visually screaming “I love you so much I risked burning my hand on my Crock-Pot for you!” Maybe you’ll even use this guide and make a date night out of it. I only dream of helping you on your journey of eternal love while I spend my Valentine’s Day evening waitressing and trying not to throw up.
For more bittersweet Valentine’s Day sass, follow Hope on Twitter @HavingHope14
Related Articles
The Brokelyn guide to making your own lip balm
Pucker up, broke people! Are your lips cracked up like mine are every winter? If they ARE then you’re in luck, I […]
Crafter slam! The Daily show needles Etsy makers
Remember Paul Ryan? He was that child actor the Republicans hired to try to run in between Barack Obama’s legs while he […]

How bazaar: Get ready for a whole month of night shopping
Brooklyn’s answer to the recession: make consumerism a party! The Brooklyn Night Bazaar is back for a festive holiday season run of […]
2 Comments
Leave a Reply
If I have someone to give chocolate on Valentine’s Day, I think I will spend time to make this. Looks better than some in store.
A homemade valentine is so special, and I always keep them.