
Ever have something that should be played at high volume, preferably in a residential area? Not that we here at Brokelyn would advocate disturbing the peace, but New York is (quite literally) a loud city, and why should automobiles have all the fun on the run when it comes to mobile sound? Radio Raheem bore the burden of the boombox, but you don’t have to!
Technology’s progressed even if society in many ways hasn’t (the racism and police brutality featured in the climax of Do the Right Thing rings truer than ever today), and your options for mobile sound compound when you bring your bicycle into the mix. The question remains: how exactly do you deck out your draisienne with dope audio? We’ll demonstrate four different ways, from shamelessly storebought to solidly soldered, depending upon whether you prefer taking it easy and taking your tunes with you indoors and out or prefer getting your hands dirty and riding around on a permanent party machine.
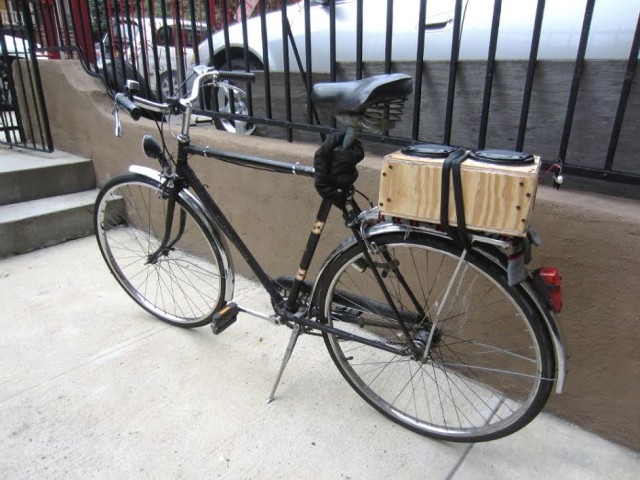
1. Carry your boombox as cargo using straps
Good, old-fashioned ghetto blasters gobble up D-cells as you hobble about town awkwardly under their weight, but strap that mothertrucker to the rear rack of your bicycle, and you’re free to breeze through Brooklyn unencumbered, with a weight literally taken off your shoulders.
This is perhaps the most flexible of options, as you can indeed start with 1980s tape deck technology and swap out state-of-the-early-2010s-art Bluetooth speakers at your leisure/next paycheck. Power and sound are already taken care of for you, wedded together in one sealed unit, and when you arrive at your destination, you can take your jams with you. (This also implies that there’s nothing left behind for casual thieves to jack.)
Two rules of thumb when adopting this approach:
A) Make sure your speakers are strapped down securely
Bungee cords work, but the real workhorse, here, is the tarp strap, made of rubber, both stronger and grippier than your typical bungee: just one of these’ll do ya! (Word to the wise with either: be very careful when attaching these guys to your bike’s rack, as if they suddenly come loose, they will take an eye out. Fair warning.)
_____________
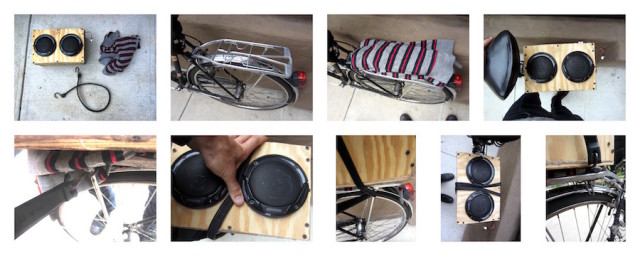
This author built his very own hacky, DIY Bluetooth jambox: basically you want to build an appropriately-dimensioned, rigid box to hold some suitable speakers, some kind of amplifier, and a power source), but the same rules apply to attaching your own jambox (or box of jams, for that matter: point is, you’re securing a somewhat delicate thing that you don’t want to fall on the ground and break).
B) Add some cushion below your box o’ sound, for its own sake (excessive vibration often causes things to break) and absorbing the bumps makes it far more difficult for your speakerboxxx to wiggle itself loose.
Make sure to first put down some padding (a thin, folded-over sweater, a beach blanket, etc.) and secure the strap to both sides of the rear rack.
See to it that the padding doesn’t have any unsecured loose ends that could get caught in your wheel while riding, and give your bike a good shake test before hitting the road. (Also, in the early stages just after hitting the road, look back from time to time to make sure your speakerbox stays put.)
How to make sure you hear it
One last thing: directionality. It may sound obvious, but speakers are typically loudest in whichever direction they’re facing. This means if they’re facing left, they’ll be loudest there, and if they’re facing right, they’ll be loudest in that direction. Duh. What you may not initially consider, however, is the fact that sound likes to bounce off things. Speakers out in the wide open will not sound nearly as loud as they would in a room because there are no walls to reflect the sound off of and back to you, but as soon as you pass by a hard object outdoors, e.g. a parked car, any sound aimed in that direction will instantly become considerably louder.
Two ways to address this: Point your speakers up so the sound distribution is even relative to you and reverberates off of nothing; or point your speakers down so your can bounce your sound off the ground and into the heavens.
Option No. 2 sounds initially sounds like the most attractive, as you’ll scatter the sound more evenly around you, allowing for you to be bathed in acoustic bliss as you pedal down the road, but it may be more difficult to pull off as you’ll likely be muffling the speakers’ output with your cushioning, and the shape of your speakers might get in the way of them laying flat against the (cushion over) the rack. Ultimately, the orientation of your speakers, much like that of your sexuality, is up to you.
N.B.: Some Bluetooth speakers are specifically designed to project sound omnidirectionally, which may help out with making things equally loud in all directions. Some. of. these. are even splash resistant if you’re anticipating battling the elements. One of those cylindrical speakers fits very neatly in the average bike water-bottle holder.
_____________
backpack + carabiner + mesh bag + bluetooth speaker = portable sound when riding my bike pic.twitter.com/WjjpoDWPE3
— dan riti (@danriti) December 12, 2015
2. Bag your ‘box
Paper or plastic? Try canvas (or whatever synthetic fiber they use these days to make backpacks). This is literally as easy as adding an additional (large) object to the list of things you tote around in your favorite rucksack or messenger bag; however, the results are often less than satisfying because all that sound is trapped in there (imagine stuffing a pillow into your speakers).
If you figure out a clever way of letting those speakers breathe — such as using a mesh bag — you’ll be much happier with the results. Just make sure that cracking your bag open doesn’t also give your speakers an opportunity to escape. (This I guess also applies to the principle of putting pets in bags.)
_____________
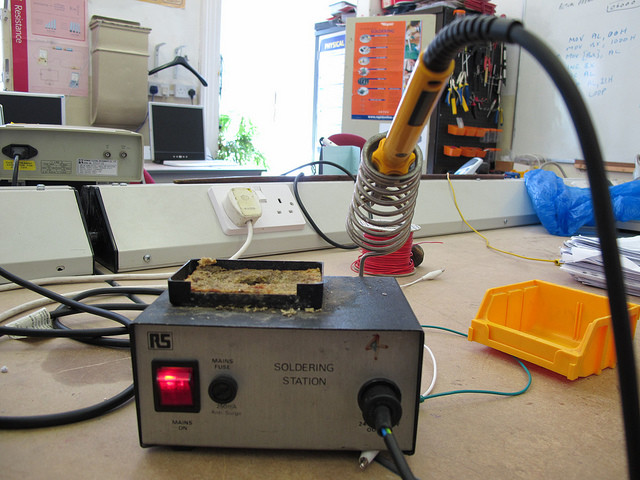
3. Solder your way to victory
Oh God, oh God, oh God, why would you make me use a soldering iron?! Admittedly, melting lead isn’t for everyone, but if you’re super into the idea of not only carrying around but actually integrating speakers into your ride, NYC-based DIY electronics darling Adafruit has a decent tutorial for turning your wheels into a permanent party machine.
The pros of this approach? Your speakers travel with you wherever you go: you never have to worry about leaving them behind, and you can rock out on a whim. The cons of this approach? It’s certainly more involved, it adds a little bit of weight to your bicycle, and if you’re not fastidious about weatherproofing everything, you’ll have to think twice about casually locking your bike up outdoors (also, if you don’t securely attach all of the components, theft may become an issue).
This author’s two biggest qualms with the above video tutorial: The speaker isn’t in an enclosure, so it’ll be very quiet and tinny. Also, it jumps to 3D printing as the immediate solution for fixturing, when in reality, you can do most of that (and most of that better) with parts from your local hardware store and a little ingenuity.
Okay, nerdy third thing to whine about: batteries. Why all the crappy batteries? Ideally, you’d make whatever battery (pack) you use rechargeable and use a dynamo and a voltage regulator/charging circuit so you’d never need to worry about swapping AAs out, i.e. running out of juice and killing the world. The takeaway from this approach is that it’s similar to what went into that aforementioned DIY Bluetooth boombox: it integrates speakers with an audio amplifier and power source.
_____________
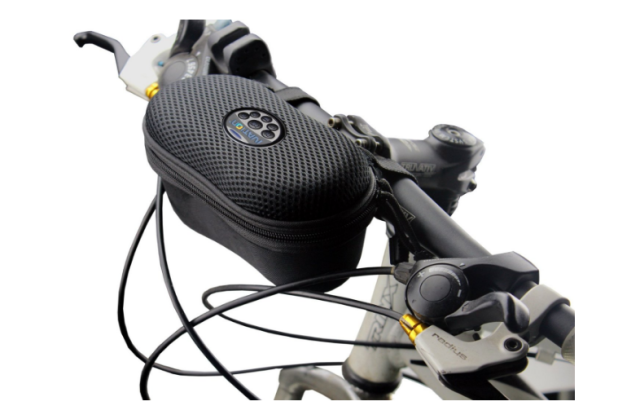
4. Buy speakers specifically designed to attach to your bicycle.
As a no-shit-Sherlock departing gesture, I offer the example of the handlebar-mounted bike speaker. It exists. It’s easy, it’s cheap (just $20): go out and buy it (I guess).
Pros: you don’t have to bend over backwards with creative sonic solutions and you can take ’em with you. Cons: this underpowered solution is far from block-rocking (then again, you can angle it more towards your face so that you will hear all you can hear).
This author’s already biked on down to the beach several times with his hacky homemade speakers, serenading the streets of Southern Brooklyn with mid-aughts nu disco, much to the enjoyment of the occasional pizza delivery guy he’s found himself waiting at the light next to, and likely much to the dismay of the Chasidim of Midwood lining the Ocean Parkway bike path (just look at this fucking hipster).
It’s a good time of year to be out and proud, and you might as well do it under your own power and with your own tunes. Live it up, and hit us up in the comments with creative solutions you’ve got, brokesters, towards fulfilling your pedal-powered musical dreams.
Related Articles

A genius winter cocktail: Egg Shop’s Anonymous Eggnog
Eggnog is a classic holiday staple and it’s ultra easy to whip up at home.


No gym, no problem: How to use a NYC playground as a workout center
For many of us, myself included, a gym membership or yoga subscription is a luxury we simply cannot afford. During the winter […]
Leave a Reply